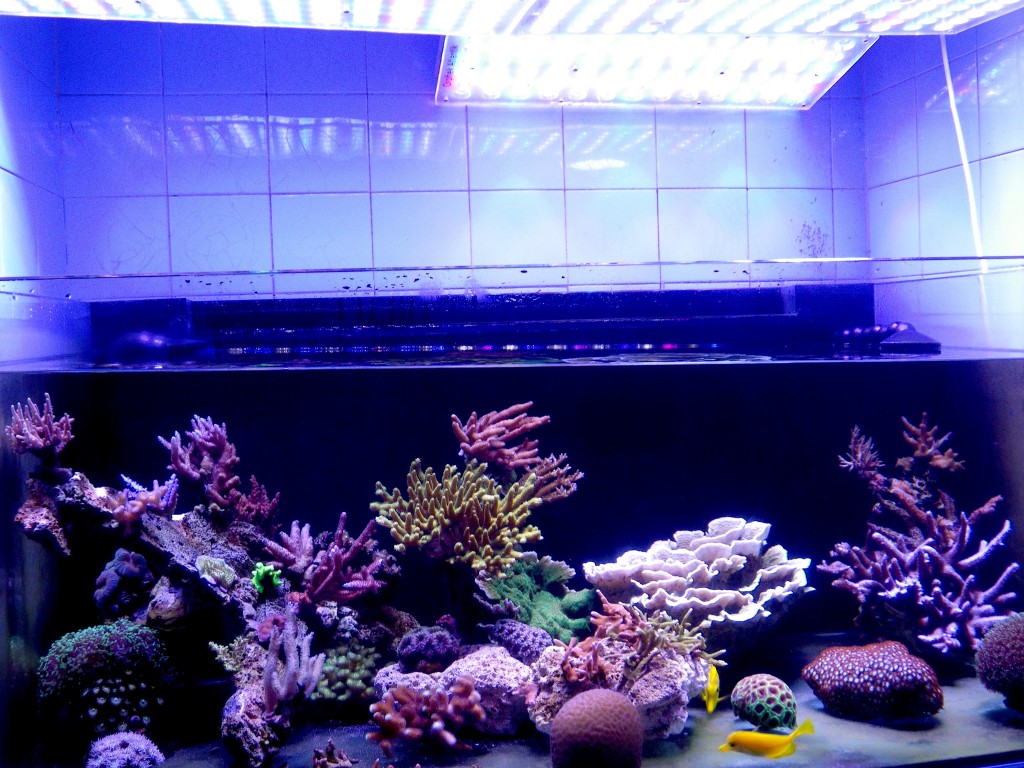
Installation- proper installation of your new lights is something that will give you options for adjustment later. When planning your mounting, allow yourself the ability to raise and lower the lights if possible. Raising/lowering the light will give you the ability to adjust coverage of the tank and the intensity of the light in the tank. You will need this ability later. You can also use angle to get the exact look that you want in your tank. Bringing the fixture forward and tilting the front edge down (figure 1.1) will allow you to reduce the amount of light on the front glass, direct more of the light onto the front face of your live rock structure and because of the angle; you will have more consistent PAR throughout the tank. Reducing the amount of light on the front glass also reduces the amount of algae you have to remove from the glass during your regular tank maintenance.
Fig. 1.1
Adjusting the light- The next step is to get the look and intensity that you want. If your light is dimmable this is the time that you will determine the peaks in your light schedule. Begin by adjusting the different channels to achieve the “perfect” look. Be sure to include each channel to maximize the results in your tank. Think of it as “High Noon”, at the peak of your light cycle, what do you want the tank to look like? Once you have this dialed in, write down the percentages that you have each channel at. This will become the peak percentages that your light schedule uses. Keep in mind that you do not have to run any fixture at 100%. All too often people run their fixtures at 100% because they don’t understand the amount of light that is really going into their tanks, this can result in corals that eventually bleach due to too much light. It is better to start low and raise the amount of light.
 Owners of existing systems need to be mindful of the intensity that leds offer and ensure that they do their best to duplicate the previous intensities. The use of a PAR meter is often helpful in this task. Many clubs and stores have units that can be borrowed or rented. There are even online rentals that can be found.
Schedule- Now that you have the peaks planned, it’s time to determine the overall schedule of your lights. This is different for every tank and is often based upon the lifestyle of the owner. If you are an early riser and like to see your tank in the morning then your schedule will begin early. If the tank is in an office setting then the tank should match the office hours to allow visitors and staff to see the tank in all its beauty. If you are installing the lights on an existing system then you need to work to get it as close to the old schedule as possible.
Owners of existing systems need to be mindful of the intensity that leds offer and ensure that they do their best to duplicate the previous intensities. The use of a PAR meter is often helpful in this task. Many clubs and stores have units that can be borrowed or rented. There are even online rentals that can be found.
Schedule- Now that you have the peaks planned, it’s time to determine the overall schedule of your lights. This is different for every tank and is often based upon the lifestyle of the owner. If you are an early riser and like to see your tank in the morning then your schedule will begin early. If the tank is in an office setting then the tank should match the office hours to allow visitors and staff to see the tank in all its beauty. If you are installing the lights on an existing system then you need to work to get it as close to the old schedule as possible.
 In this example we are going to plan the light schedule for a typical household that gets up and off to work early but has evenings at home when the owners wish to see the tank. They also like the blue moonlights and fluorescent look that they give in the evenings just before lights out. The family typically goes to bed shortly after 11pm.
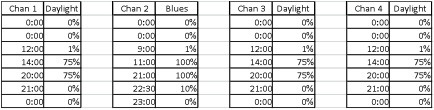
Fig. 1.2 You can see in figure 1.2 that there are three channels that will be combined to create the daylights, channels 1, 3 and 4. They are set to peak at 75 % and run this from 2pm to 8pm with one hour of dimming before and after the cycle. In figure 1.2 you can also see that channel 2 is the blue LED channel, that the peak is 100% and set to run from 11am – 9pm, with 3 hours of ramp up and 2 hours of ramp down. You will also notice that there is a 1/2 hour from 10:30pm to 11pm in which the blue leds go from 10% to 0%. This gives the last little bit of light for the end of the day, just like the last ½ hour after sunset before it gets dark. We do not recommend running the blues or any moonlight all night. Corals and other animals need time rest. Nocturnal animals also need their time to do what they do and too much light can inhibit this.
 Implementation and Adjustment- Now that we have our full cycle planned and the lights installed we can put the plan in action. Begin by programming the cycle into your lights and letting it run for several days. Be sure to check your corals each day. Checking polyp extension is often a good way to determine if corals are happy. Open polyps and swollen corals can indicate that they are happy with the light they are receiving. Hidden polyps, shrunken soft corals and corals that retract in the middle of the day are often signs of too much light. Watching your tank daily will help you to make a determination of what is needed and allow you to make small changes to reach the maximum potential. Changes should always be made gradually (unless there is a very strong reason for doing them quickly). Changing light schedules and intensities us also something that should be done as little as possible Consistency will bring success and changing these will cause a little stress each time that it’s done. Typically one can wait 1-2 weeks between adjustments to allow the corals to settle in, however, if your corals are not opening then you may need to reduce the amount of light that they are getting quickly to ensure that they are not damaged.
Reducing light- This can be done through several different methods. Each has its own benefit. We suggest raising the light or reducing intensity first before changing the actual time schedule.
Implementation and Adjustment- Now that we have our full cycle planned and the lights installed we can put the plan in action. Begin by programming the cycle into your lights and letting it run for several days. Be sure to check your corals each day. Checking polyp extension is often a good way to determine if corals are happy. Open polyps and swollen corals can indicate that they are happy with the light they are receiving. Hidden polyps, shrunken soft corals and corals that retract in the middle of the day are often signs of too much light. Watching your tank daily will help you to make a determination of what is needed and allow you to make small changes to reach the maximum potential. Changes should always be made gradually (unless there is a very strong reason for doing them quickly). Changing light schedules and intensities us also something that should be done as little as possible Consistency will bring success and changing these will cause a little stress each time that it’s done. Typically one can wait 1-2 weeks between adjustments to allow the corals to settle in, however, if your corals are not opening then you may need to reduce the amount of light that they are getting quickly to ensure that they are not damaged.
Reducing light- This can be done through several different methods. Each has its own benefit. We suggest raising the light or reducing intensity first before changing the actual time schedule.
- Raising the light- increasing the height of the light above the water will lower the amount of light that is reaching the corals in the tank. This reduction is consistent throughout the tank and this is why it’s often the best option.
- Reducing intensity- this option achieves the same results as raising the light but it also changes the peak look that you liked in the tank. If you reduce the amount of light too much it can appear too dim for your preference. We suggest reducing the intensity in 5% increments on daylight channels. Typically blue channels can be left are the original peak.
- Reducing time- Changing the light timing can also be done but this could impact your enjoyment of the tank if it reduces your viewing time. If you need to reduce the amount of time we suggest doing it when you are not around the tank. Starting a peak at 3pm instead of 2pm will reduce 1 hour of time but will not affect the viewing time if no one is at home. You can also move the peak time from 2pm to 3 pm but leave the beginning time at 12pm. This will give you 3 hours of ramp up time instead of 2.
- Individual corals can be moved around to accommodate their own sweet spots. If the rest of your corals are showing positive signs then you can move unhappy corals around to find the best spot for them. This can often be as much about water flow as it is about light.
 Increasing light- This can be done easily now that you have installed the light correctly and programmed the unit based upon peak. As you acclimate your corals to higher intensities they will often increase in coloration. You can experiment with this by placing frags of some corals in different locations of the tank. We suggest using increasing the time schedule or intensity before lowering the light.
- Increasing the intensity is easy to do since you did not max the fixture out at 100% when doing the initial setup. Adding an additional 5% at a time on the daylight cycle will often add enough light to address any issues you may be seeing (soft corals reaching for the light, Anemones moving in search of more light, SPS corals losing color).
- Increasing the light schedule in 15 minute increments can also give the tank more light by adding to the total amount of light the corals can take in throughout the day.
- Lowering the light is another thing that can be done. Doing this can reduce the coverage of the tank and this is why we recommend it as a last step.. Lowering the light can drastically raise the amount of PAR reaching the corals. Hot Spots can increase as well so it’s important to be very careful when using this method. This is often a good indicator that you have not put enough light over your tank and is seen a lot when trying to light larger tanks with smaller hobby related lights. Some companies often rate their fixtures to cover more area than they are actually able to cover with useful amounts of light. If you purchase 2 units of a company’s lights with the expectation that it will provide for SPS and it doesn’t then you will need a third and chances are that you will buy that third unit from the same company which means additional expenses for you and profit for them. This is where understanding what you are buying and the capabilities ahead of time will save you headaches down the road.
No comments:
Post a Comment